Debian
Installation
Debian is a Linux distribution which can run on your NAS. This distribution is started within the base linux environment of your NAS. Using Debian, you can use more programs then the fun_plug only environment. You will need Debian to get HellaNZB started for instance. You should first consider installing fun_plug only. When this suits your needs, you don't need Debian. This is what you have to do to install Debian:
1. Create a directory for Debian and open it
# cd /mnt/HD_a2/
# mkdir debian
# cd debian
2. Download the 'Etch' distribution (this is preconfigured for NAS)
# wget http://dev.skcserver.de/dns323/etch.tar
3. Extract.
# tar -xf etch.tar
4. Start the Debian distribution with chroot command.
# chroot etch /bin/bash
You are in your Debian distribution now
5. Edit the resolv.conf file. This sets your connection routing. (In this case we use vi as editor, but you can use notepad++ in /debian/etch/etc/ or Joe)
# vi /etc/resolv.conf
Please add your gateway's IP(router) in this file, for instance:
>> search wan
>> nameserver 192.168.2.1
6. Update package list with apt-get:
apt-get is a command to download packages for Debian. It's wise to update a list of downloadable packages.
# apt-get update
Maybe you will get CPG errors. CPG errors are errors that have something to do with authentication method Debian uses to communicate with the package servers. CPG errors can be fixed by issuing the folowing command, using the key you will see on your screen (for instance. NO_PUBKEY H293993D4U86TYR). Issue the command after each CPG error. Fix this until '# apt-get update' doesn't give errors anymore.
# apt-get install debian-archive-keyring
# gpg --keyserver wwwkeys.eu.pgp.net --recv-keys H293993D4U86TYR
# gpg --armor --export H293993D4U86TYR | apt-key add -
# apt-get update
7. Create Image
Create an image of the current Debian setup:
# apt-get install cdebootstrap
# cdebootstrap -aarm etch etch ftp://ftp.ie.debian.org/debian
8 Compress the new 'etch' folder
# tar cf deb_ch3snas.tar etch
9. Exit Debian environment
# exit
10. You are back in the basic environment. Delete the earlier downloaded etch.tar and copy the newly created. Delete the etch directory.
# rm etch.tar
# cp etch/deb_ch3snas.tar etch.tar
# rm -Rf etch
11. Extract your own version (check whether you are in the ../debian/ folder !)
# tar -xf etch.tar
12. Start your newly created Debian environment
# chroot etch /bin/bash
13. Repeat step 5
14. Create a hosts file, where your local IP adres is linked to your host:
# vi /etc/hosts
Add the following lines (taking into respect your own IP situation). Add IP adress and NAS name)
>> 127.0.0.1 localhost
>> 192.168.2.1 CH3SNAS
15. Repeat step 6
16. The basic installation of Debian uses free-package mirrors. From these mirrors you can only download packages which are licensed to be free. Nothing wrong with this. When you want to intall HellanNZB with automated extraction, you have to change your mirror to download RAR. If you don't want to use HellaNZB you can skip this step.
!! By changing to a non-free mirror it's your responsibility to license downloaded software. For instance RAR !!
# vi /etc/hosts
Pas de "deb ftp://ftp.ie.debian.org/debian etch main" regel aan:
>> deb ftp://ftp.nl.debian.org/debian stable main contrib non-free
17.Upgrade Debian to latest packages
# apt-get update
# apt-get dist-upgrade
Create a password for your 'root' user. After the command you have to give your new password twice. (note: using the 'root' user for daily activities is strongly rejected by most linux users. Take that into consideration when your NAS is open to the outside world.)
# passwd root
18. It's usefull to access your NAS from the outside world by using SSH (secure encrypted version of telnet). Install with the following commands
# apt-get install ssh
19. Add a line to your fun_plug script file to start SSH when starting NAS. (this is how you acces Debian when your NAS is started)
>> cd /mnt/HD_a2/debian && chroot etch /etc/init.d/ssh start >> /var/log/ssh.log 2
Debian is ready for use! In chapter HellaNZB is explained how you can start this process in the Debian environment. You can start your Debian environment by issueing this command from your telnet session. # chroot etch /bin/bash
HellaNZB (Debian only)
HellaNZB is a Usnet client which is easy to configure. You can download .nzb, par2(repair) and unrar. U can alter the configuration file to enable by your own wishes.
1. Install the following components. Please understand that unrar is not free. You should license this.
#apt-get install unrar
#apt-get install par2
#apt-get install hellanzb
2. After installation the config file has to be changes. You can find it in /etc/hellanzb.conf Edit with vi or another programBewerk deze met vi of iets anders. Define your news server in the 'define server' part. Change PREFIX_DIR line in the following matter:
>> Hellanzb.PREFIX_DIR = '/.hellanzb/'
3. Search for the following line: "#Hellanzb.UMASK = 0022" Remove the # and change as mentioned below. This will provide good file rights by HellaNZB in Daemon mode
>> Hellanzb.UMASK = 0000
4. In this folder you can put .nzb files which are directly downloaded by HellaNZB. You can start HellaNZB by the issueing the following command # hellanzb te geven. You can test it's funcionality by putting a .nzb file in the daemon.queue folder. Downloaded files will be stored in "/.hellanzb/done" Don't forget to close HellaNZB properly by giving 'shutdown' in it's screen. Shutdown can take a while.
6. Add the following line to your fun_plug file to start HellaNZB as daemon (-D option). This will load HellaNZB when starting your NAS (basic Linux environment)
>> cd /mnt/HD_a2/debian && chroot etch /usr/bin/hellanzb -D >> /var/log/hellanzb.log
7. After restart, switch to folder "/.hellanzb/nzb" Here you can find the folder "daemon.queue". Because this folder doesn't have the proper rights, change it
# CHMOD 777 daemon.queue
Light HTTP daemon (lighttpd) (Debian only)
Light HTTP daemon is a webserver, which supports PHP. We need this to run Zussaweb (HellaNZB web interface). De server can also be used for other purposes.
1. Install lighttpd webserver and needed packages.
# apt-get install lighttpd
# apt-get install php5-cgi
# apt-get install libterm-readline-gnu-perl
After installing, the daemon is automatically started. This will give an error message, which will say port 80 is in use. This is because the NAS's webserver itself runs on port 80 (web interface). Ignore this for now.
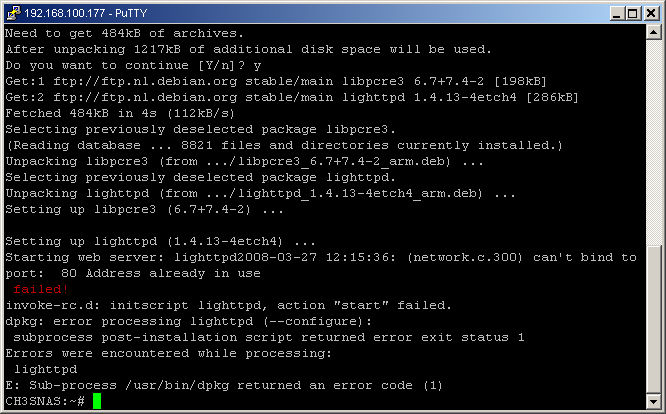
Error message after installing packages
2. The configuration has to be written and activated now:
# /bin/cp /etc/lighttpd/conf-available/10-fastcgi.conf /etc/lighttpd/conf-available/10-fastcgi-php5.conf
# /bin/sed -i -e 's/php4/php5/g' /etc/lighttpd/conf-available/10-fastcgi-php5.conf
# /usr/sbin/lighty-enable-mod fastcgi-php5
3. Open configuration file:
# vi /etc/lighttpd/lighttpd.conf
4. Remove # befor the following line: "# server.port = 81"
# server.port = 81
5. Load lighttpd by issueing the following command (process is stopped first, in case you had it running already)
# /etc/init.d/lighttpd force-reload
6. Browse to the IP adress of your NAS on port 81 (e.g. http://192.168.x.x:81). You'll get to see a placeholder page. Your HTTP daemon with PHP support is running now. This is needed for the next step.
7. Add the following line to your fun_plug file to run Lighttp as daemon when starting your NAS. (basic Linux environment)
>> cd /mnt/HD_a2/debian && chroot etch /usr/sbin/lighttpd -f /etc/lighttpd/lighttpd.conf
Zussaweb (HellaNZB web interface) (Debian only)
It would be easy to manage your Hellanzb downloads by using a web-based interface. A nice interface is that of Zussaweb. This is how you install it:
1. Go to Lighttpd www folder and download Zussaweb
# cd/var/www
# wget http://garr.dl.sourceforge.net/sourceforge/zussaweb/zussaweb03.tar.gz
# tar -xf zussaweb03.tar.gz
2. Change the config file. Open the settings.php file
# cd zussaweb
# vi settings.php
3. Edit things, just like in underneath screendump
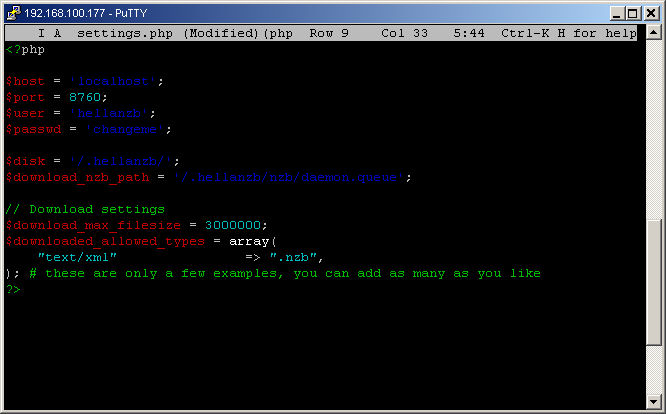
Zussaweb -> Settings.php
In the current version of Zussaweb is a minor bug. See screendump.
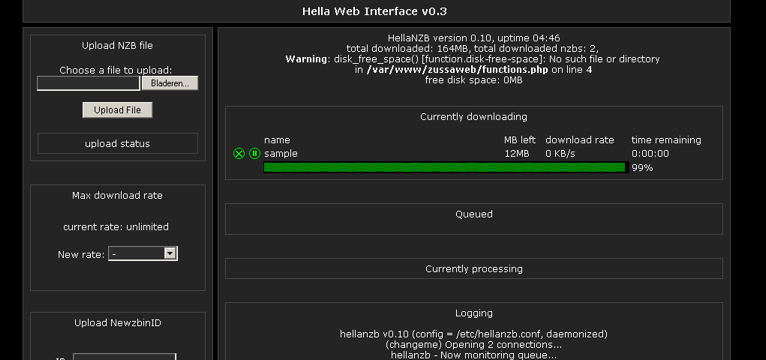
Zussaweb interface, with error message
Fix this by opening functions.php and edit line "disk_free_space.." as shown in underneath example.
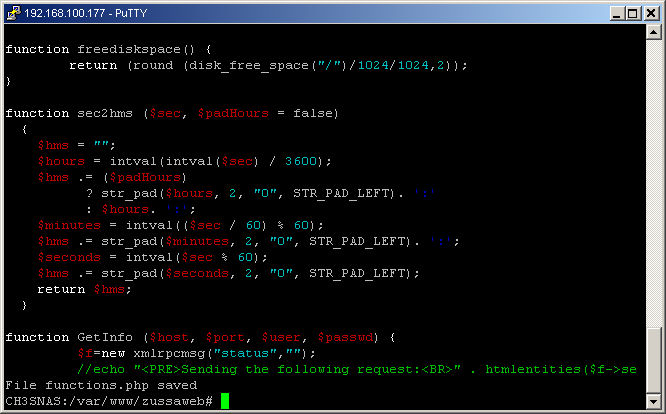
The Zussaweb functions.php file
Now you can reach your web interface by going to http://192.168.x.x:81/zussaweb/ . Zussaweb does not have to be started manually. Only pages which are loaded by Lighttpd.
Slimserver (Debian only)
For the use of Slimserver you need to follow these steps:
1. Install Slimserver (install all related packages, and optinally firmware for your squeezebox)
# apt-get update
# apt-get install slimserver
2. Edit the configuration page.
# vi /mnt/HD_a2/debian/etch/etc/default/slimserver
Change the "HTTP_ADDR=192.168.x.x" to your NAS's IP adress and save to file.
3. Add the following line to your fun_plug file to start Slimserver on the NAS (basic Linux environment)
>> cd /mnt/HD_a2/debian && chroot etch /etc/init.d/slimserver start >> /var/log/slimserver.log 2>&1
4. If you installed both Twonky and Slimserver, it's needed to change the http port number. Both programs use port 9000. The most easy option is to change this in the Slimserver configuration. You first have to stop the Twonky process first, for instance with the killall command.
Go to your Slimserver configuration at http://xxxx:9000 and go to 'server settings' and 'network' . Edit the portnumber and save. Reanimated Twonky by rebooting. Check if everything is ok.
5. Configure your slimserver by using the web interface. That's it.

